Andrey Lаppo - Technical Writing Portfolio / Writing Samples
OCR Workflow for Document Archives
Note: This is an anonymized translation of internal documentation created for Russian-speaking colleagues at an e-commerce company. Interface elements and software names appear in Russian as they were used in the original workflow. The company managed 50,000+ product documentation files requiring OCR processing for searchability.
Document Type: Technical Process Documentation
Audience: content managers, technical staff
Original Language: Russian
This workflow handles OCR (Optical Character Recognition) for PDFs in a large documentation archive. Three types of documents need different approaches:
- Already searchable PDFs > nothing to do
- Scanned images > standard OCR
- PDFs with text in curves > special handling required
The third type is the tricky one. Print-ready PDFs often convert text to vector curves so fonts print consistently. These files look like they have text, but it’s actually vector graphics. You can’t OCR them until you convert the vectors back to images.
Initial Assessment
Preparation:
-
Install PDF-XChange Pro
-
Open the PDF in PDF-XChange Editor Plus
-
Do basic cleanup if needed:
-
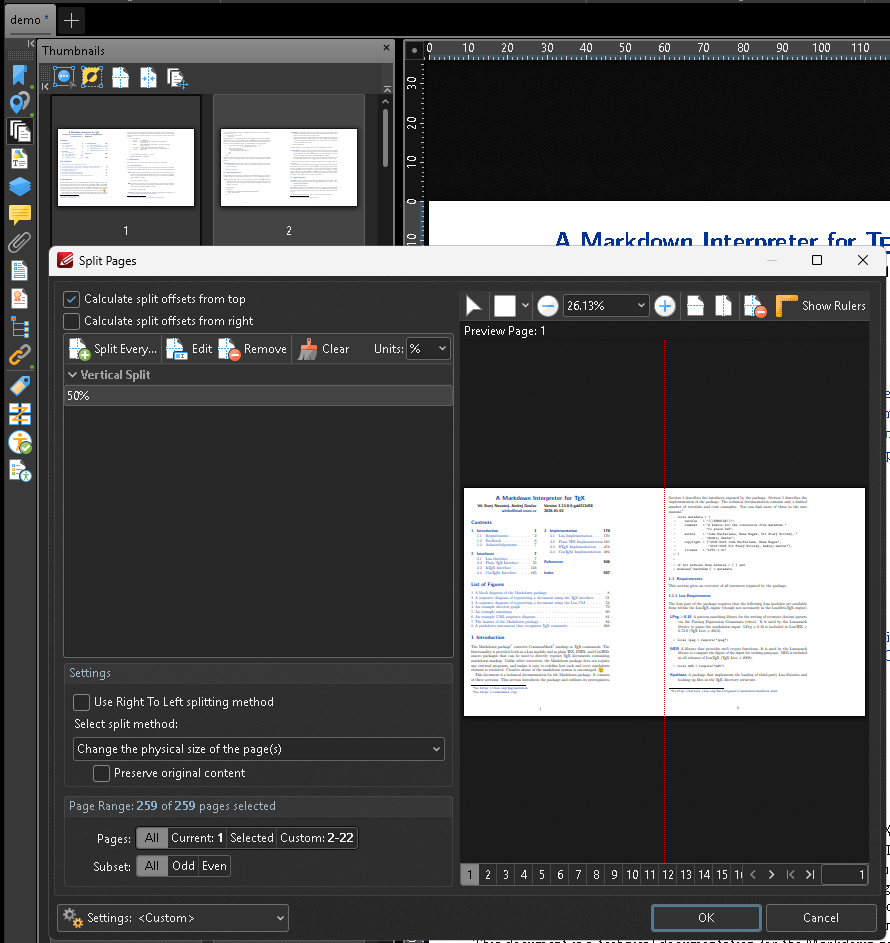
Split facing pages: Split Pages… (Split pages in the active document)
Click to see screenshot
-
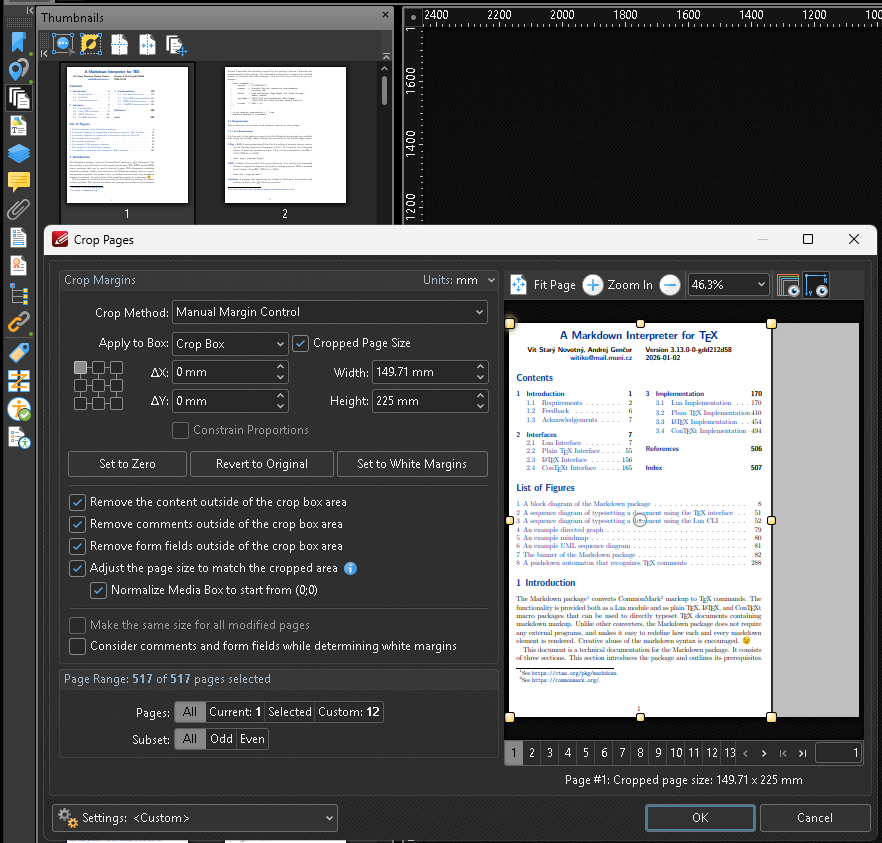
Crop printer’s marks: Crop Page Tool (Draw boundaries over the page, to define the crop box)
Click to see screenshot
-
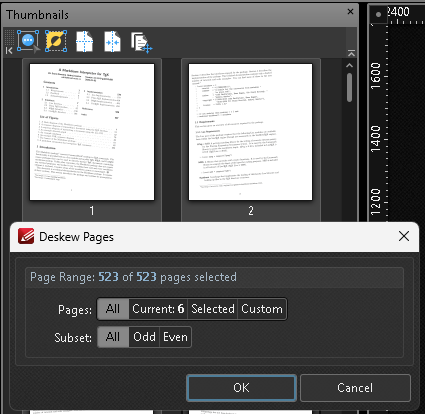
Fix skew: Deskew Pages Content (Deskew scanned images in the document to improve reading and text recognition)
Click to see screenshot
-
Check page numbering: drag pages in the thumbnail panel or use Move Pages (Move pages of the active document)
-
-
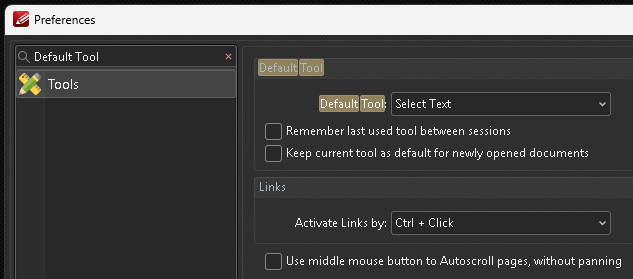
Try selecting text with the cursor. (When processing many documents, it helps to set File > Preferences > Tools > Default Tool to Select Text so that’s the tool that opens by default.)
Click to see screenshot
͏͏͏
- If text selects, copy it and paste into any text editor (Notepad, WordPad, Word, whatever). Check if it matches what you selected in the PDF. If it matches, the document doesn’t need OCR. Move to the next document and start this workflow over. If text doesn’t select, only partially selects, or the pasted text doesn’t match what’s displayed, keep going through these steps.
- Take a quick look at what languages appear in the document. If you’re not sure, copy a sample into Google Translate with auto-detect turned on.
-
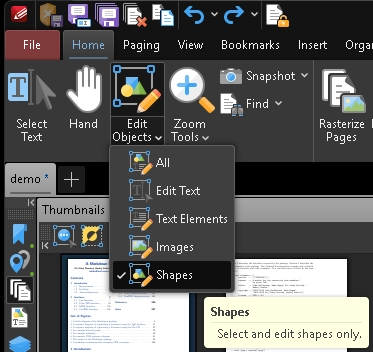
In the toolbar, click the bottom part of the Edit Objects combo button, choose Shapes, and try selecting text by dragging with the left mouse button. If individual letters get selected, go to the next section. Otherwise, skip to the OCR Methods section.
Click to see screenshot
Handling Text in Curves
Sometimes text is saved as curves. Usually this means the file was prepared for printing. You’ll need to convert the curves into something OCR can handle—raster images. Pick any method below, then move to the OCR Methods section.
Method 1: PDF-XChange Editor > Sanitize Document (Removes sensitive information, such as metadata, form data, invisible contents…)
Click to see screenshot
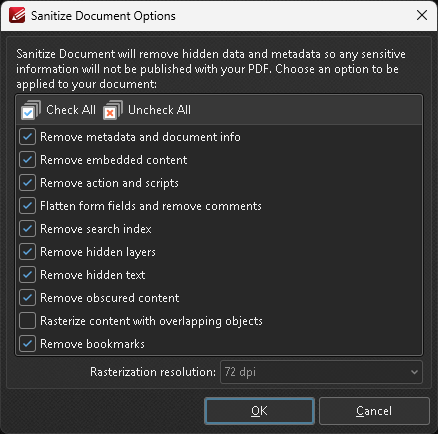
Check all boxes except Rasterize content with overlapping objects. Save the document. File size won’t change much. This probably won’t work, but it’s worth trying.
Method 2: Same as above, but check Rasterize content with overlapping objects.
The Rasterization resolution field will unlock. Enter at least 200 DPI. For proper recognition, 300 DPI is better. For high-quality layouts, for printing, or if the document has small text, use 400—600 DPI. Rough estimate for required resolution: aim for 30—40 pixels of height for the smallest text size in the document. (30 is good, 40 is excellent.) File size can increase 15—60x (!).
Method 3: PDF-XChange Editor > Export > Export to Image(s)
Click to see screenshot
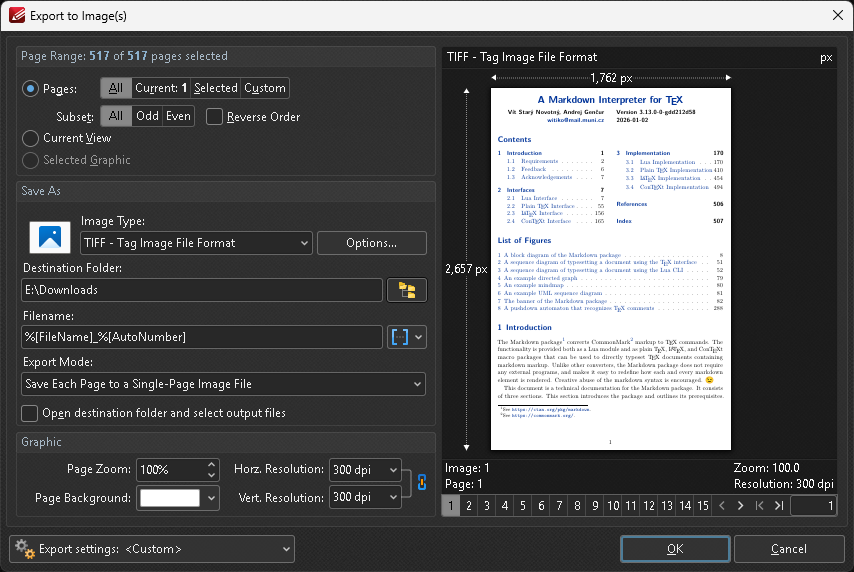
- Pages: All
- Image Type: PNG - Portable Network Graphic
- Export Mode: Save Each Page to a Single-Page Image File
- Horz. Resolution and Vert. Resolution: see the previous method for resolution guidelines
Reassemble the resulting images using PDF-XChange Editor or PDF-Tools.
Method 4: ABBYY FineReader PDF > Edit > Delete Objects and Data… > check all boxes > [b]Apply[/b]
File size can increase ~50x.
Method 5: There’s another way to preserve the original appearance completely, barely change the file size, work regardless of font-background contrast, and add an invisible text layer. I regret only learning about it after writing this workflow. It requires more advanced techniques not covered here.
OCR Methods
Choose whichever method seems more convenient, accurate, or faster for your situation.
OCR in PDF-XChange Editor
- With the document still open, click OCR Page(s) (Recognize text in scanned documents using the Optical Character Recognition (OCR))
-
In the OCR Pages (Enhanced) window, use checkboxes to select the needed languages, plus Ignore existing text on page, Ignore comments on page, Ignore form fields on page, and under Output Options set Type to Searchable Image
Click to see screenshot
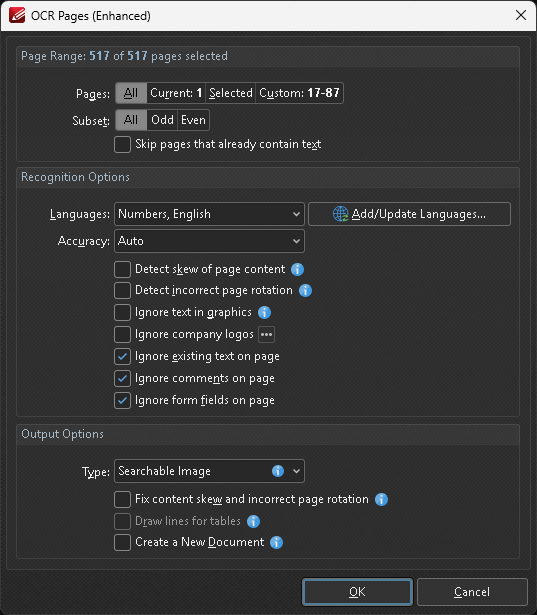
- Click OK
- After processing finishes, check the result and save the file
OCR in ABBYY FineReader PDF
- Close the document
- Install ABBYY FineReader PDF
- Copy the full path to the PDF document. In File Explorer you can do this with the Copy as path button on the toolbar or through the context menu with Shift + RMB
- RMB the PDF in File Explorer, choose Convert with ABBYY FineReader PDF > Convert to searchable PDF document
- Paste the path you copied into the filename field
- In the OCR languages field, choose the document’s languages (from step 6 in the Initial Assessment section)
- Make sure in Options > OCR:
- PDF recognition mode: Use OCR
- OCR speed and accuracy: Thorough recognition
- Document type: Auto
- Use of patterns and training in OCR Editor: Use built-in patterns
- Check for Headers and footers, Table of contents, Numbered lists, and Footnotes
- On the Image Processing settings tab, it’s better to uncheck all the Image preprocessing settings (apply to conversion and OCR) boxes
- Click Save, confirming overwrite
Settings will be saved. You won’t need to go into them in the future.
OCR in PDF-Tools
- Close the document
- Launch PDF-Tools
- Choose OCR Pages (Optically recognizes text characters in a PDF document, creates selectable and searchable text layer on pages)
-
Check boxes for Batch Processing Mode, Multi-Threaded Processing Mode, Do Not Ask for Passwords, Allow select multiple files, Show extended dialog for files selecting, OCR Pages, Show setup dialog while running
Click to see screenshot
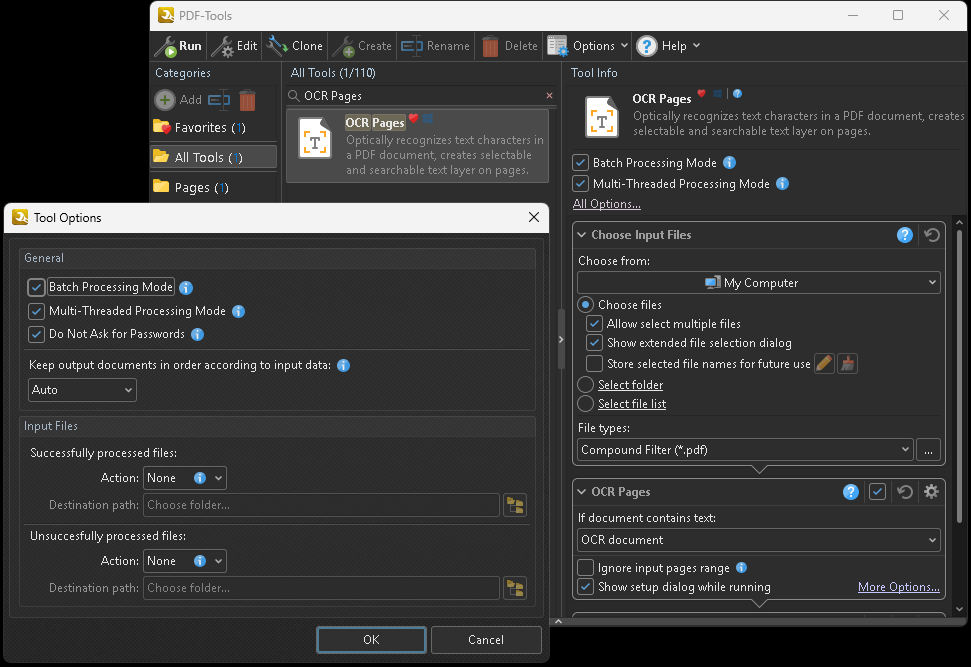
-
Choose Input Files > File types: PDF Documents (*.pdf)
OCR Pages > If document contains text: OCR document
In the Save Documents module:
- Save to: My Computer
- Folder: Use source folder as destination
- Filename:
%[FileName] - When file already exists: Overwrite with a new file
For OCR Pages (Enhanced) settings, use the same ones from the OCR in PDF-XChange Editor section above
- Drag the PDF from the file manager onto the tool icon (or double-click the tool icon, drag the PDF onto the Choose Input Files window, and click OK)
- Choose the document’s languages, confirm, wait for recognition to finish (green progress bar at the top of the PDF-Tools main screen)
- Close the PDF-Tools window
Quality Control Notes
Unfortunately, manually typing model numbers, article codes, and product codes leads to errors. Similar-looking characters get mixed up: the numeral 1 vs. lowercase l vs. uppercase I, Latin O vs. Cyrillic О vs. the numeral 0, and so on. When working with technical documents, I recommend using select-copy-paste whenever possible. If you spot a suspected or obvious error, send it immediately to the archive administrator with the filename, page number, and a brief description.
Another issue: PDFs often have line breaks (in some cases only the first line of selected text gets pasted), and automatic recognition sometimes incorrectly determines text blocks.
For the first issue, use any lightweight text editor. Enter the PDF text block edit mode, copy the text to the text editor, remove unwanted line breaks, copy the cleaned text, paste it back where you got it.
For the second issue, use ABBYY Screenshot Reader (included with ABBYY FineReader PDF): launch it from the Windows Start menu. If no window appears, click the red icon with white frame in the system tray. In the dropdown list under Снимок choose Области, under Передать choose Текст в буфер обмена, select the language (avoid Авто unless the language is truly unknown), press Alt + Enter, select the area of the needed “dead” text as close as possible without overlapping, press Enter, paste where you intended. For offline recognition using a single language, you can also use ShareX. It’s FOSS but a bit complicated to set up initially.
Common OCR Errors
When copying technical specifications, these character confusions happen frequently:
1(one) vs.l(lowercaseL) vs.I(uppercasei)0(zero) vs.O(capitalo) vs.О(Cyrillicо)8(eight) vs.B(capitalb) vs.В(Cyrillicв)5(five) vs.S(capitals)-(hyphen) missing or replaced with—(em dash)
Always use copy-paste for product codes and model numbers. Don’t manually retype them. Report suspected OCR errors to the archive administrator immediately.
Resolution guidelines:
- 200 DPI: minimum, OCR accuracy will be questionable
- 300 DPI: recommended for most documents
- 600 DPI: high-quality originals, small text, or if you need to print from the result
Rule of thumb: if you can’t read it comfortably on screen at 100% zoom, OCR probably can’t either.
This workflow was developed for processing mixed-format PDF documents including scans, vector PDFs, and print-ready files with outlined text. It’s been tested on technical specifications, product catalogs, brochures, and multi-language documentation.